Designing User Interfaces For Android Wear Part 1: Lists
Rising in popularity after the latest Google I/O, Android Wear is a game changer for mobile development. Wearable technology has brought benefits from a quicker access to information to a more accurate monitoring of our physical health. Developing for this platform allows you to tap into those features that are not as readily available on mobile handhelds as well as offer a more immersive experience of your product by making it available on wearable devices.
As always, the documentation will offer the most thorough insight into what is available, but I’d like to discuss how the UI development differs and how you can get started.
WatchViewStub
The first class you should learn about from the Wear library is WatchViewStub. This class is responsible for determining the screen shape of a Wear device. Currently there are two (or three) shapes of Wearable devices: square and round, with some round devices having an inset at the bottom. Assuming you’d like your Activity to appear differently for each device, your activity_main.xml file should have this component as its root view:
<android.support.wearable.view.WatchViewStub
    xmlns:android="http://schemas.android.com/apk/res/android"
    xmlns:app="http://schemas.android.com/apk/res-auto"
    xmlns:tools="http://schemas.android.com/tools"
    android:id="@+id/watch_view_stub"
    android:layout_width="match_parent"
    android:layout_height="match_parent"
    app:rectLayout="@layout/rect_activity_main"
    app:roundLayout="@layout/round_activity_main"
    tools:context="com.androidessence.watchsample.MainActivity"
    tools:deviceIds="wear"/>
The main attributes to notice here are app:rectLayout and app:roundLayout. The layouts specified in each are the layouts that will appear on the device when the Activity loads, after the device shape has been determined.
Unlike an Activity on a mobile handset, referencing views is not as simple as calling findViewById() inside of onCreate(). You need to wait until the WatchViewStub has inflated the necessary layout. You do so by attached an OnLayoutInflatedListener:
final WatchViewStub stub = (WatchViewStub) findViewById(R.id.watch_view_stub);
stub.setOnLayoutInflatedListener(new WatchViewStub.OnLayoutInflatedListener() {
    @Override
    public void onLayoutInflated(WatchViewStub stub) {
        // Handle views
    }
});
If the same resource identifiers are used in both round and square layouts, your code can be the same here. If you need to do something special programatically based on screen shape, see this article from the documentation.
BoxInsetLayout
This layout is similar to a FrameLayout but is aware of the type of screen and is used to display something the same way on both round and square devices.
WearableListView
Extending from the new RecyclerView, a WearableListView is simply a list component optimized for Wear devices. It is optimized by only showing three list items at a time, so the item height is programatically determined by the component. This is to allow for easier click handling of list items. It is also recommended that you create a special layout for each list item, so you can use an OnCenterProximityListener to provide a special implementation for views when they appear in the middle of the watch screen, as explained here. In this first segment on Wear UI, we’ll go through that in a little more detail, skipping over what we’ve already touched on.
List Item
In this sample, we’ll use a WearableListItemLayout that extends from TextView, so we can just simply display some words on the screen for testing purposes:
public class WearableListItemLayout extends TextView implements WearableListView.OnCenterProximityListener{

    WearableListItemLayout(Context context) {
        this(context, null);
    }

    WearableListItemLayout(Context context, AttributeSet attributeSet) {
        this(context, attributeSet, 0);
    }

    WearableListItemLayout(Context context, AttributeSet attributeSet, int defStyle) {
        super(context, attributeSet, defStyle);
    }

    @Override
    public void onCenterPosition(boolean b) {
        // When centered, let's enlarge the text.
        // As of API 23, we don't need to pass context.
        if(Build.VERSION.SDK_INT >= Build.VERSION_CODES.M) {
            setTextAppearance(android.R.style.TextAppearance_Large);
        } else {
            setTextAppearance(getContext(), android.R.style.TextAppearance_Large);
        }
    }

    @Override
    public void onNonCenterPosition(boolean b) {
        // When leaving centered, set text backk to small.
        if(Build.VERSION.SDK_INT >= Build.VERSION_CODES.M) {
            setTextAppearance(android.R.style.TextAppearance_Small);
        } else {
            setTextAppearance(getContext(), android.R.style.TextAppearance_Small);
        }
    }
}
As mentioned, we can implement the OnCenterProximityListener so that items in the center of our list at the time can be enlarged, as seen by this photo:
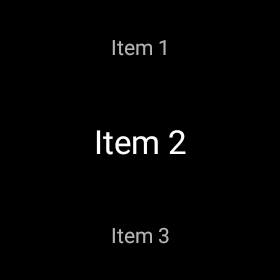
We also implement the onNonCenterPosition method so that when an item moves out of the center location, it returns back to the appropriate text appearance.
Earlier I stated that the WearableListView class extends from RecyclerView, as a result the Adapter class is setup in a very similar fashion, so it has been omitted from this post. If you would like to see it, please check the code on GitHub, which you can also run on your own Wear device or emulator to see the list in action.
More information on running your Wear app can be found here.